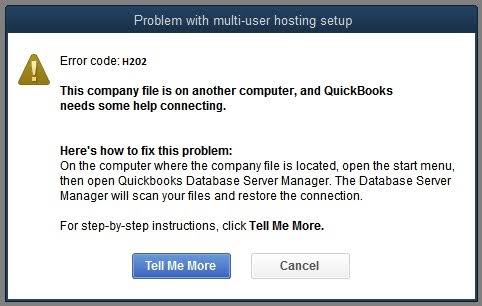
QuickBooks is a powerful accounting software used by businesses to manage their finances efficiently. However, users often encounter issues when switching to multi-user mode, with QuickBooks Error H202 being a common problem. This error occurs when QuickBooks cannot connect to the server, preventing access to the company file in a multi-user environment. In this guide, we’ll explain the causes of Error H202 and provide effective solutions to resolve it.
What Causes QuickBooks Error H202?
Understanding the root causes of Error H202 can help in preventing it from happening again. Here are some common reasons:
- Incorrect hosting configuration settings
- Blocked communication due to a firewall
- Damaged or corrupt QuickBooks Database Server Manager
- Missing or inactive QuickBooks services (e.g., QBCFMonitorService)
- Incorrect DNS settings
- Damaged Network Data (.ND) file
How to Fix QuickBooks Error H202
Follow these step-by-step solutions to resolve the issue:
1. Check QuickBooks Hosting Settings
- Open QuickBooks on all workstations.
- Go to File > Utilities.
- If you see “Host Multi-User Access,” it means hosting is disabled, which is correct.
- If you see “Stop Hosting Multi-User Access,” click it to disable hosting on the workstation.
2. Use QuickBooks Database Server Manager
- Open QuickBooks Tool Hub (download it from Intuit if you don’t have it).
- Click Network Issues and open QuickBooks Database Server Manager.
- Scan your company file location and restart the service.
3. Configure Windows Firewall
- Open the Windows Defender Firewall.
- Go to Advanced Settings > Inbound Rules.
- Create a new rule allowing QuickBooks programs (QBDBMgrN.exe, QBW32.exe).
- Repeat the process for Outbound Rules.
- Restart QuickBooks and try multi-user mode again.
4. Edit the Windows Hosts File
- Press Windows + R, type
cmd, and hit Enter. - Type
ipconfig /alland note down the server’s IP address. - Open
C:\Windows\System32\Drivers\etc\hostsin Notepad. - Add the server’s IP followed by its name.
- Save changes and restart QuickBooks.
5. Rename .ND and .TLG Files
- Open the QuickBooks folder.
- Locate files with extensions
.NDand.TLG. - Right-click each file and select Rename, adding “.old” at the end.
- Restart QuickBooks and open the company file again.
6. Restart QuickBooks Services
- Press Windows + R, type
services.msc, and hit Enter. - Find QuickBooksDBXX and QBCFMonitorService.
- Right-click each service and select Restart.
Final Thoughts
QuickBooks Error H202 can be frustrating, but following these troubleshooting steps will help you regain access to multi-user mode. If the problem persists, consider contacting QuickBooks Support for further assistance.
No responses yet